Weaving Masculine and Feminine Elements through Cards for Guys
- carogeo2
- Jul 25, 2025
- 13 min read
Updated: Jul 27, 2025
Part 1 of the AECP Level 2 Final Challenge
Hello Crafty Friends!
Before we dive in, fair warning: this post is extremely long — the kind of long that pairs well with a refreshing beverage and maybe a snack or two.

Over the past few weeks, I’ve had so much fun taking on the AECP Level 2 Challenge. This creative adventure had me designing four cards for male recipients and upcycling an object. The project had to reflect techniques from three of the twenty AECP classes I took along the way.
Here are the three classes that shaped this project the most:
Color Your Day
Masking Unleashed
Easy Die Cutting Techniques
Let me walk you through how each of these classes came to life in my project.
🎨 Color Your Day: How It Inspired the Overall Concept
The Color Your Day class encouraged us to experiment with coloring media beyond our usual favorites. While the instructor didn’t demonstrate paper piecing, she did mention it as an option. I’d known about paper piecing for a while, but I’d never given it a try. Perfect time to check it off my crafty bucket list, right?
If you haven’t heard of paper piecing, look no further — I’ve included a full overview below, along with some tips and tricks.

This class also got me thinking about additional ways to bring color into my project. What came to mind was a “coloring” technique I learned in kindergarten: paper weaving. I remember proudly adding a red-and-yellow woven piece to my kindergarten album — just a simple over-under weave, but I loved it. However, I’d already used primary colors for my Level 1 Challenge, so I opted for a different palette this time: analogous colors, specifically blues and purples, with a touch of gold for contrast.
💡 By the way, here’s one of my go-to formulas for a successful color combination:
✔ Two (or more) analogous colors
✔ One complementary color for contrast
✔ As many neutrals (black, white, gray, tan, or brown) as the project demands — or as my heart desires!
Now, what about the overall concept of this project? For some reason, I associate paper piecing with flowers — those organically shaped petals “colored” with paper pieces. Meanwhile, weaving brings to mind geometric shapes like straight lines, squares, and rectangles. Together, the organic and geometric create a pleasing juxtaposition — a visual tension between what we often label as “feminine” and “masculine.” That contrast became the central concept for my four masculine cards.
By the way, you could also call these cards ‘uni-’ or ‘pan-gender.’ I’d feel comfortable giving them to anyone in my life — whether they identify as male, female, non-binary, two-spirit, pan-gender, agender, intersex, genderfluid, or simply as their unique and authentic self.
Every card features:
Organic and geometric shapes
Gel printed papers
Paper weaving
A color scheme of blue, purple and gold (plus neutrals)
One card includes a few additional colors.
My upcycled item also echoes the organic–geometric contrast, though it features a different palette.
🎭 Masking Unleashed: Creating Background Scenes
I enjoyed seeing the elaborate, layered projects in this class — but I also realized that I’ve been using masking techniques in my own cardmaking that weren’t covered in the lessons. So for this challenge, I decided to highlight one of my favorite methods: masking on the gel plate to create backgrounds and scenes for cards and envelopes.
Masking adds visual depth without bulk. It simply means covering part of your project to protect it from ink, paint, or stamping. This lets you control where color or images go — helping you build layered scenes, create crisp edges, or spotlight a focal point.
🎥 Check out the video to see how I use paper masks cut from masking paper directly on the gel plate.
But you’re not limited to paper masks — you can also use feathers, leaves, flowers and more. Die-cut or fussy-cut cardstock also works beautifully and often results in richly colored die cuts you’ll want to save for another project.
Bonus: Once you remove the masks from your gel plate, the ink left behind in their shape can also be printed — and those prints are often stunning, especially when you use natural materials like fern, leaves, grasses, or feathers.

I also demonstrate how sometimes not masking off overlapping stamps can create a beautiful effect. For example, in my anniversary card, two flowers face each other and slightly overlap. The result? A soft illusion of transparency — as if the petals are reaching out with a delicate touch, perfect for a card celebrating love.
I used masking on the envelopes as well — because details matter.

💡 Masking Tips
Press masks firmly at the edges to avoid ink bleeding.
Cover masking paper with clear tape before cutting your masks — they’ll become reusable and ink-proof.
Wipe ink off clear tape with a lint-free cloth to avoid smudging your hands or your work.
Store reusable masks with their coordinating stamp or die sets — they’re too precious to toss.
Can’t reattach the original backing? Use larger backing scraps from other projects.
Used masks from gel plate sessions make great focal points in future projects!
✂️ Easy Die Cutting Techniques: Brought to Life
This class helped me push my die-cutting skills further. Throughout this project, I explored:
Using dies to cut masks
Using stamps with coordinating dies
Altering die-cuts to create frames for weaving
Incorporating die-cut sentiments and shapes
Using dies for the eclipse technique
Working with layering dies
In addition, the With a Twist class left a lasting impact on my cardmaking. It made me pause and wonder:
What’s expected here? What’s the default? How can I stretch my creativity beyond these expectations?
For this project, my twist was to move away from stereotypical masculine imagery (sports, cars, tools…) and use florals as focal points instead. I know many guys who love flowers just as much as I do, and I enjoy creating cards for them. Most importantly, I wanted to show that floral cards can absolutely be appropriate for guys — even if you don’t know whether they like flowers or not.
GOOD TO KNOW
✂️ Paper Piecing in Cardmaking
Paper piecing involves stamping an image multiple times on different patterned or colored papers, then cutting out specific parts and assembling them like a puzzle onto a base image. It’s essentially a collaged version of stamping, and it’s a sustainable way to use up scraps.

How It Works:
Choose a stamp – bold, outlined images work well.
Stamp it multiple times — once on a panel or your card base, and again on various patterned or colored papers.
Cut out the parts you want to highlight — e.g., I cut the petals and leaves of a coneflower.
Assemble and adhere the pieces onto the base image like a mosaic.
💡 Tips:
Outline cut edges with a black marker to give them a crisp, stamped look.
Try layering dies for a more contemporary spin on paper piecing (see my upcycled object for an example).
🧵 Paper Weaving in Card Making
Paper weaving is a creative and sustainable way to use up pretty paper scraps. It involves interlacing strips of paper — much like basket or fabric weaving — to create a patterned panel or background. It adds texture, dimension and visual interest — while giving your backgrounds a tactile, handmade feel.
I especially love using gel press prints for weaving. Their variation in color and texture means every woven panel is one-of-a-kind. It’s a great way to use up leftover strips while creating something bold and beautiful.
💡 Tips:
Perfect for leftover strip scraps (e.g., from trimmed card panels) — and totally eco-friendly.
Use as backgrounds, accent panels or focal shapes.
Basics of Paper Weaving:
Materials: Paper strips (solid, patterned, gel-printed, textured, etc.); cardstock base; adhesive; scissors, paper trimmer or craft knife.
Color palettes: Try monochrome, analogous tones or bold contrast.
Weave types:
Basic over-under weave: Alternating each strip, creating a checkerboard-like pattern.
Twill weave: Over-two-under-one, alternated with a strip of under-two-over-one or similar complex patterns.
Diagonal/herringbone: For dynamic layouts.
💡 Tips for Clean Results:
Use a craft mat or grid for sharp alignment.
Secure vertical strips with masking tape while weaving horizontals (or use a weaving frame).
Trim edges neatly or use dies to cut shapes from the woven panel.
First Steps: Creating Backgrounds for Weaving and Piecing
I walk through these steps in the video, so I won’t go into full detail here — but in short, I created all my patterned papers myself.
Using my gel plate, a homemade texture plate (which I made a few years ago), analogous shades of blue and purple pigment inks and old book pages, I made multiple sheets of richly textured paper. The visible lettering from the book pages adds depth and subtle meaning to the finished flowers.
I also created additional gel prints on envelopes and copy paper (60 lbs copy paper for color printing) using the same texture plate and a slightly expanded color palette. Some of those were used in this project for backgrounds, paper piecing, or weaving; others I set aside for future projects.
Using the gel-printed papers, I paper-pieced two coneflowers — one on a white base, one on a purple base — using the Build-A-Flower: Coneflower Layering Stamp and Die Set. I also die-cut a third coneflower from another print and added color with mica sprays in shades of purple and blue.
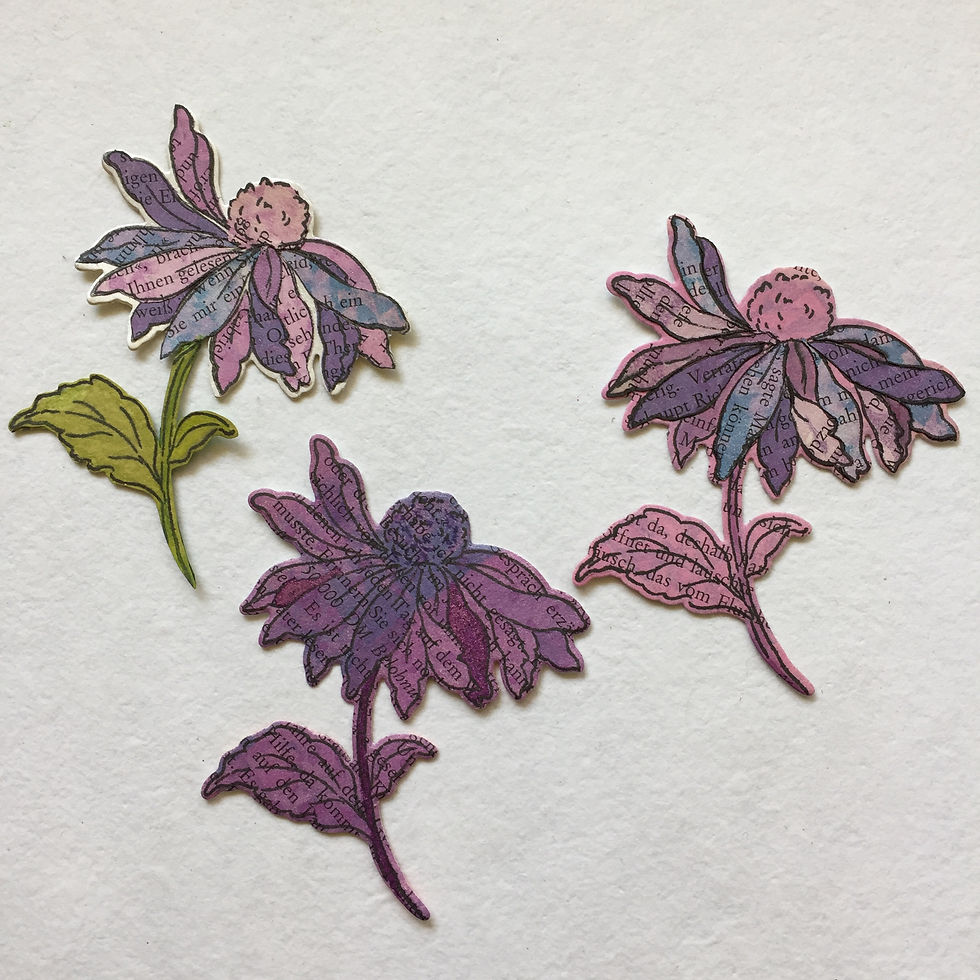
My goal? To compare the impact of paper piecing versus simply stamping the image on colored paper. The verdict? Paper piecing is absolutely worth the effort! On one flower, the book text flows continuously across the petals. On the others, the words break into fragments — partial letters and phrases that enhance the collage-like effect I was aiming for. They draw the eye in and give the focal image character.
The plain stamped flower didn’t make it onto a card — after taking the comparison photo, I paper-pieced right over it. 😉
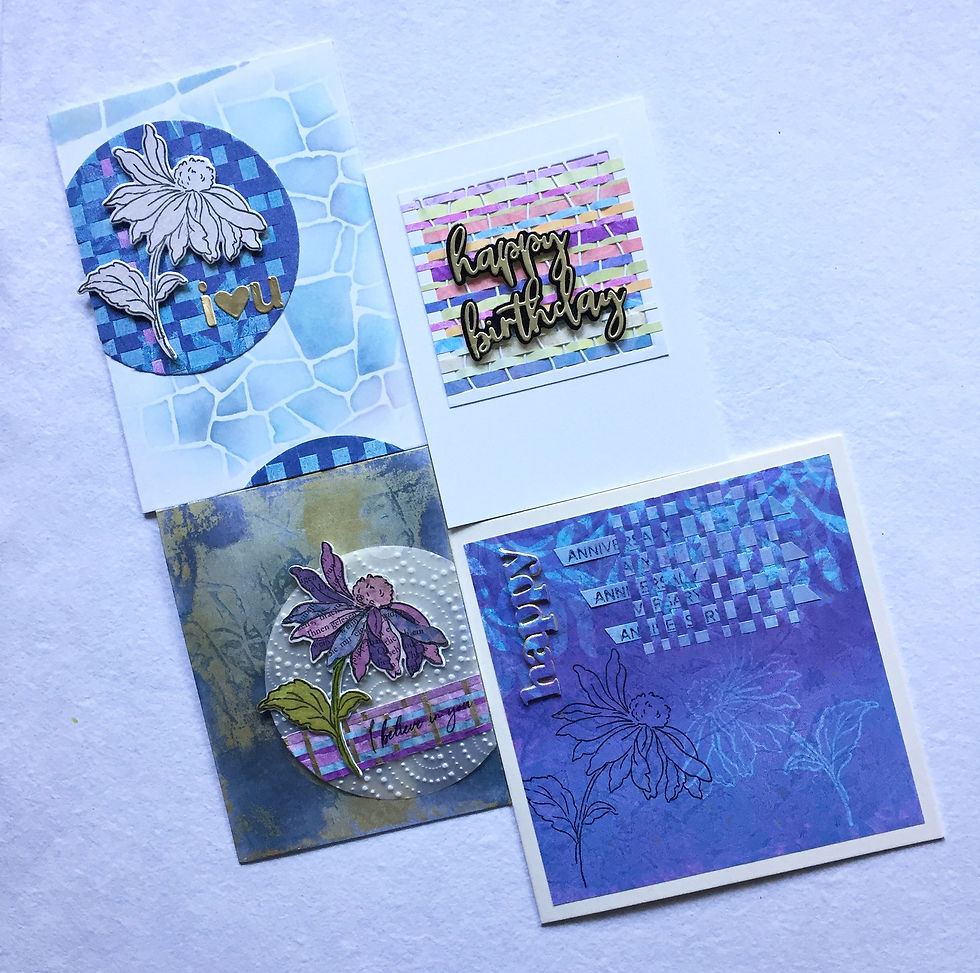
Here’s how the four cards came together:
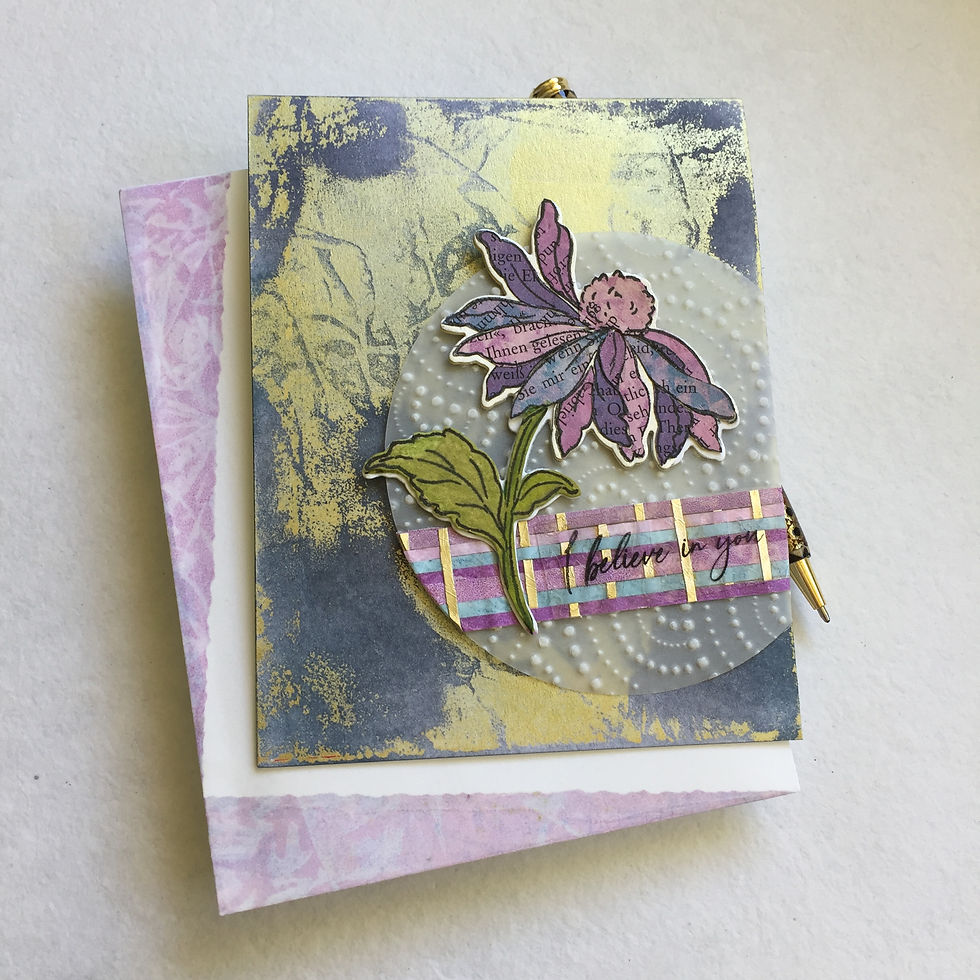
🌿 Encouragement Card
Among the four cards I made for this challenge, this is the only one that features both paper piecing and paper weaving. It’s also the only one with a mixed twill weave rather than a basic over-under pattern.
How to recreate this card:
Create a 4.25" × 5.5" background in blue and gold on your gel plate using a homemade texture plate. 💡Tip: Make a larger background and cut it down to A2 size. Depending on the size of your gel plate, you can create backgrounds for multiple cards, with leftovers for piecing, weaving, collaging, or small die-cut elements. 💡No texture plate? Try using a crumpled paper ball (about tennis ball size or larger) to create similar texture. 💡No gel plate? Use crumpled plastic on a wet watercolored or ink-sprayed panel for a similar effect. Leave on wet panel until dry.
Adhere the background to an A2 card base.

Create a paper-pieced coneflower using different blue and purple gel prints (see earlier description and/or video).
Cut a circle from heavy vellum and emboss it using the Dotty Circles 3D Embossing Folder.

Alter a brushed gold cut-out from the Grid Cover Die to create a weaving frame.

Weave thin strips of blue and purple gel-printed paper into the frame using a mixed twill weave: alternate rows of over-two/under-one, over-one/under-two, and basic over-under. Aim for a strip approx. 0.75" wide by 4.25" long.

Mixed twill weave Stamp the sentiment from the Fragile Foliage Stamp Set onto acetate and let it dry. Adhere it to the woven strip.
Adhere the woven strip to the bottom third of the embossed vellum circle. Trim the overhang on the left side, following the curve. Then trim off about one-sixth of the right side of the circle.
Adhere the coneflower to the left side of the circle, just above the sentiment. Place a stamping block or heavy book on top while it dries.

Add foam tape behind the flower and woven strip to hide adhesive and adhere the circle to the lower right of the card front.

Pair the card with one of the blue and purple envelopes you created using the gel plate.

💡 Bonus Tip: You can use woven panels themselves as texture plates on your gel plate!
💕 Anniversary Card
This card was created almost entirely on the gel plate (see video).
How to recreate this card:
Follow the video tutorial to create a nature scene with masked leaves and a mirror-stamped coneflower.
Trim the panel to 5.5" square.
About 1" from the right edge, cut vertical slits of varying widths into the panel — not so deep that they reach the flower.
On another gel-printed panel, stamp "Anniversary" repeatedly using the All the Hearts Stamp Set.

Cut strips wide enough to keep the word “Anniversary” visible. Cut two extra narrow strips without stamping.
Weave the strips into the slits using a basic over-under pattern. Start and end with unstamped strips. Let parts of the stamped word peek through in different places.

Angle-trim any overhang and secure the ends with glue.

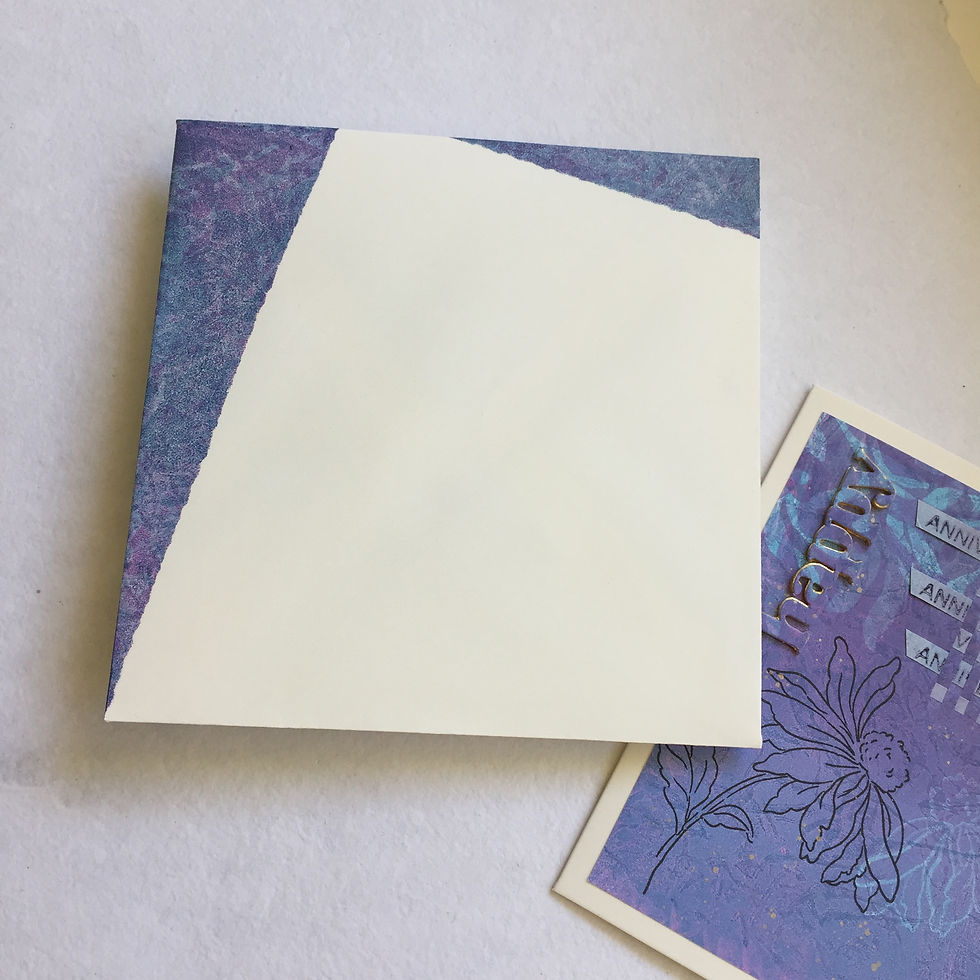
On the left side of the panel, die-cut the word “happy” using the Versatile Greetings 2 Die Set. Save both the word and the fall-out pieces.
Also cut "happy" from fun foam. Paint the foam edges gold and let dry.

Add gold splatters to the card panel by watering down a bit of gold acrylic paint or ink.
Glue the panel onto a 6" × 6" card base.
Temporarily inlay the original die cut “happy” to adhere the fall-out pieces.
Remove the original die cut “happy” and glue onto the fun foam “happy.”
Inlay the dimensional “happy”.

Pair the card with a large square envelope printed with blue and purple gel press designs, after masking a large section off (see video).
💙 Love Card
This card started with my messed up gel print. The video captured my zealous stamping that resulted in an over-stamped coneflower. On the card, the weaving hides the accident and saves the print from landing in the paper recycling bin.
If you don’t have a similar “oops” print, you can use any panel in your chosen palette.
How to recreate this card:
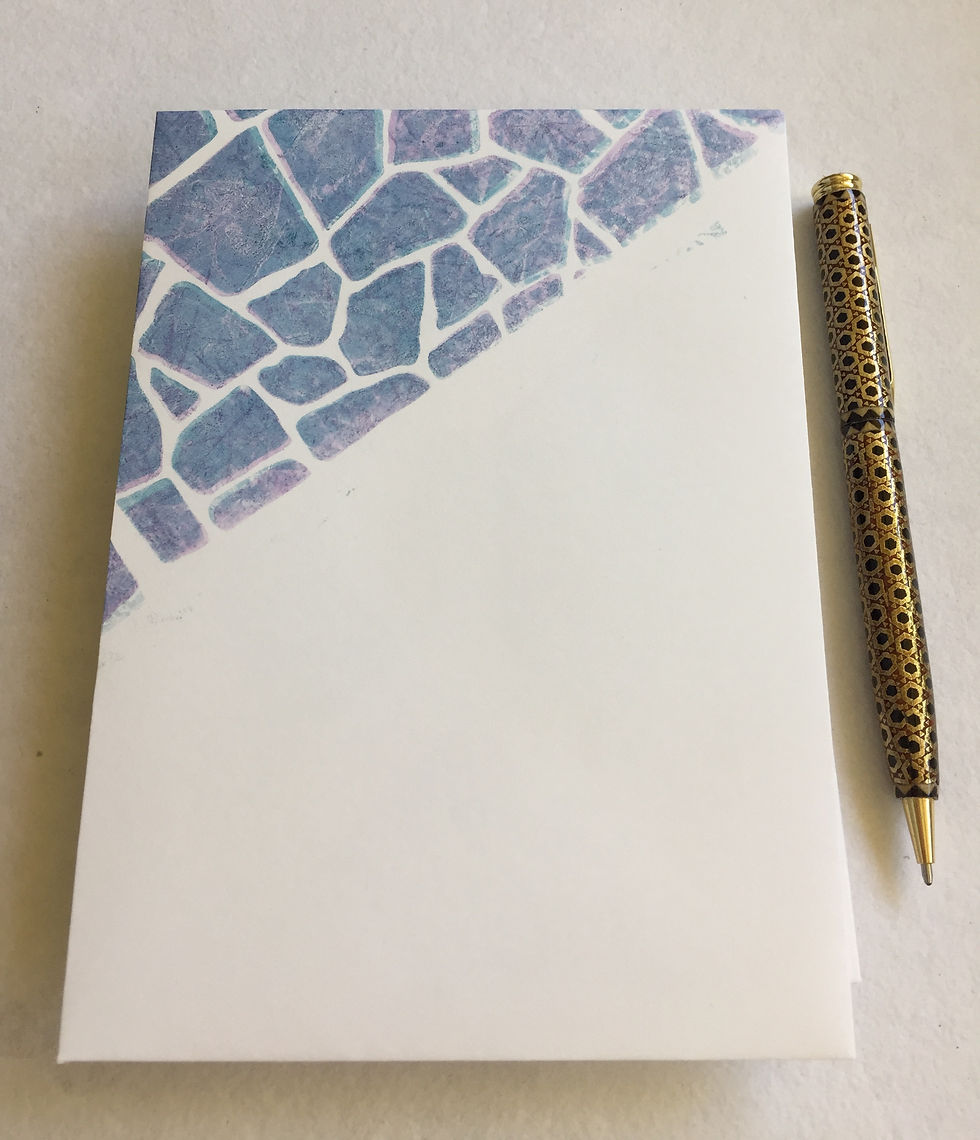
Stencil an A6 card base using the Stone Wall Stencil and a trio of inks: Morning Frost, Hydrangea and Ocean Waves. Blend colors randomly to create the illusion of dimension.

Trim your gel-printed panel to 5.5" square.
Cut slits across about two-thirds of the panel — vary their width.
Cut weaving strips from a second, color-coordinated gel print, varying their width as well. Weave them through your panel.
💡Tip: For a more symmetrical look, use uniform slit & strip widths instead.

Add double-sided adhesive to the back of the woven panel.
Die-cut a circle from the woven area, saving both the circle and the panel.
💡Tip: Save the leftover panel — it’s perfect for another project.
Stamp and die-cut a coneflower on pearlized white cardstock. Add foam tape to the back.
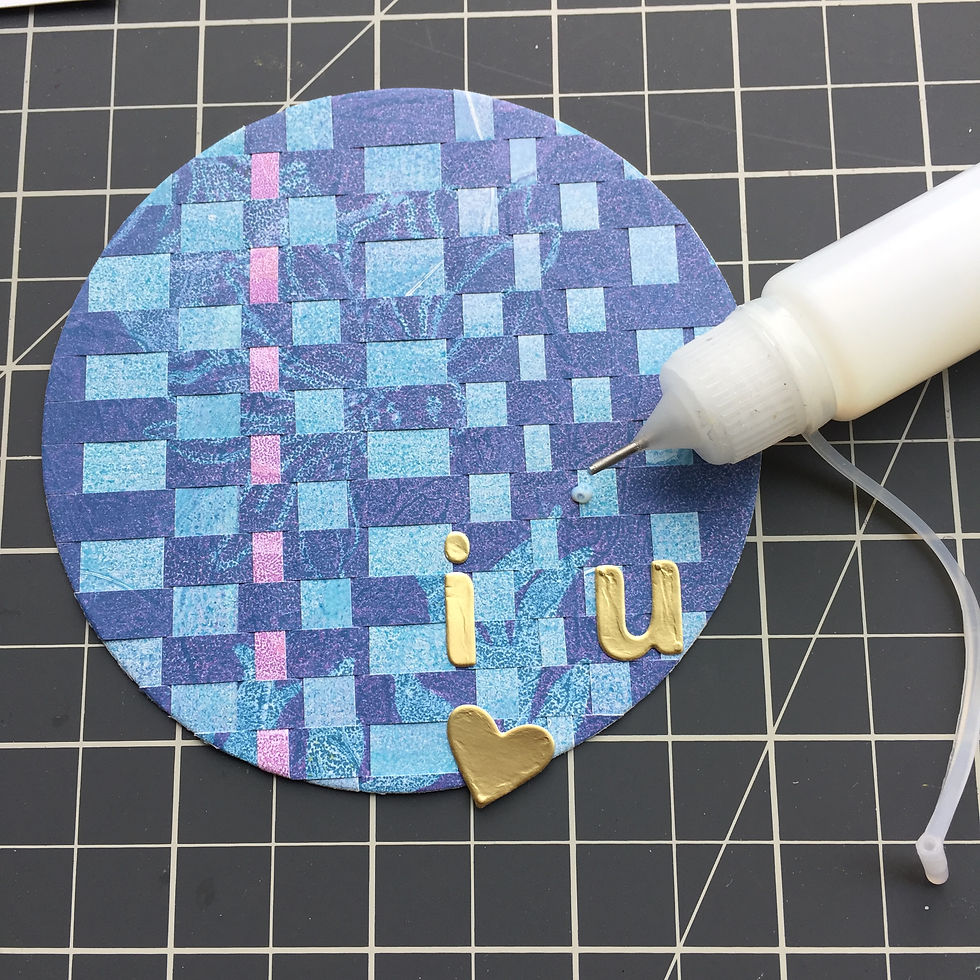
Using the Simple Alpha Die Set, cut “i” and “u” from Brushed Gold Metallic Cardstock. Add a heart die-cut (I used one from the Envelope Liner Die Set).

Cut a small slice from the woven circle. Adhere the large portion to the upper left and the smaller piece to the bottom right of the card.
Pop up the coneflower to the left of the “i ❤️ u.”

Pair with a matching envelope, stencilled and gel-printed using masking and your texture plate (see photos/video).

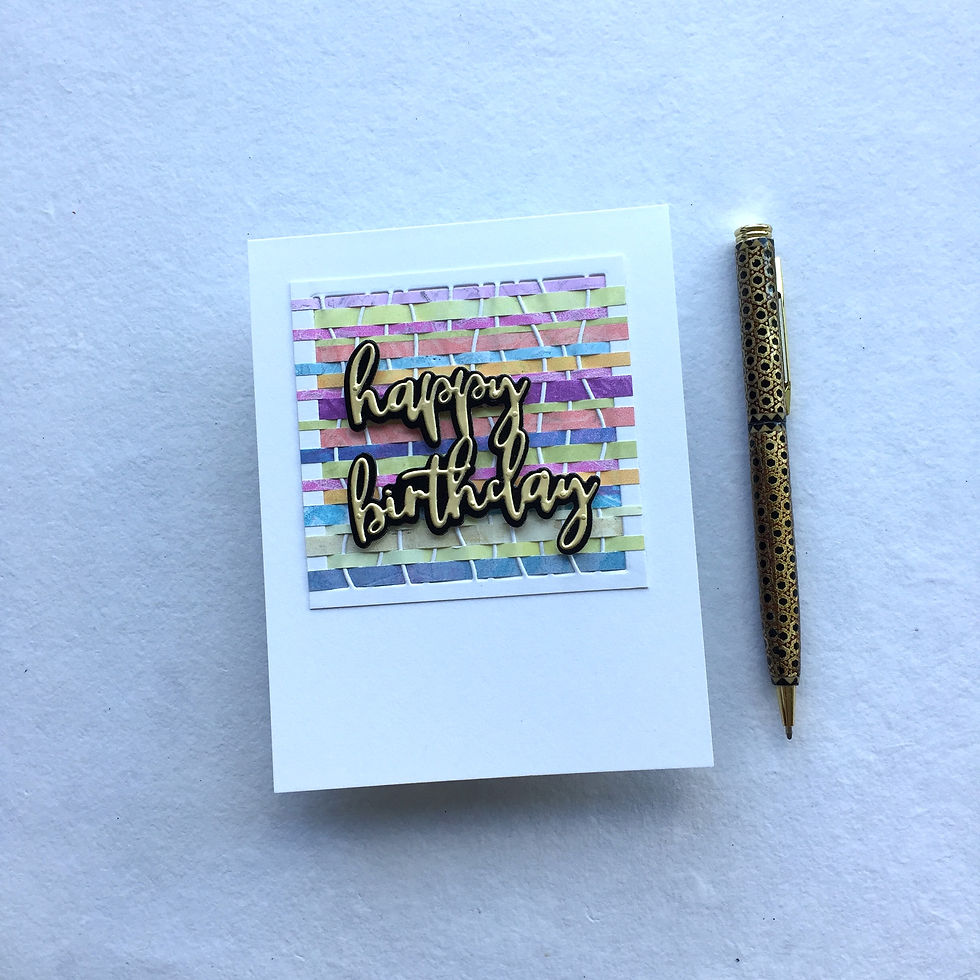
🎉 Birthday Card
This card is clean and simple — no coneflower, and a brighter palette. Perfect for those hesitant to send florals to guys.
I used an older die from a company that is no longer in business, but you can still recreate this card using the Grid Cover Die, for instance, and alter it in the same way we did for the Encouragement Card. The only difference is that your panel will have clean, straight lines running both vertically and horizontally. If you'd like to soften the look, you can also cut wavy strips to weave through the frame for a softer more playful look.
How to recreate this card:
Create a woven panel using very narrow strips of gel-printed paper in bright colors. Weave them into an altered Grid Cover Die panel cut from white cardstock.
💡 Tip: The last strip can be tricky to thread. Try using a paper piercer, tapestry needle, crochet hook, knitting needle or toothpick. Go slow — and if it doesn’t work, skip it and loosen the weave slightly.

Add double-sided adhesive to the back of the woven piece.
Trim a 3.25" × 3.25" square from the woven panel.

Die-cut “Happy Birthday” from Brushed Gold Metallic Cardstock and its shadow from glossy black cardstock (cut the shadow twice for added dimension) — both backed by double-sided adhesive. Layer them together.

Adhere the sentiment to the center of the woven square using foam tape.
💡 Tip: Once adhered, polish the sentiment with a soft cloth because glossy cardstock shows every finger print and every speck (see picture below).

Center the square near the top of an A2 card base, leaving even spacing on three sides.
Pair with a matching envelope. I embellished mine with colorful gel-printed textures on both the front and back, plus a printed liner inside (see video part 2).

🌸 Bonus Card
Miss the florals? Here’s one more — and a few surprises in the 2nd part video!
This bonus card features a blue-and-purple paper-pieced coneflower —complete with golden splatters — on a fancy vellum label (cut with Labels & Tags 1 Die Set) adhered to an embossed background. I swiped Desert Night and Antique Gold ink over the raised dots for extra drama.

I embellished the vellum label with Clear Iridescent Stellar Sequins and added a sentiment die-cut from Pink Ruby glitter cardstock.
This one is earmarked for a male friend of mine. I know he'll love it. And of course it comes with a gel-printed envelop as well.

🎥 Watch Part 2 of the Video:
See all finished cards (including bonus ones) and the altered object — a storage solution for small stamps and dies. I’ll share more about that part of the project in my next post, so this one doesn’t turn into a full-length novel. 😉
🛠 Altenew Materials Used (4 Cards & Bonus Card)
Build-A-Flower: Coneflower Layering Stamp & Die Set
Just Leaves Die Set
Grid Cover Die
Dotty Circles 3D Embossing Folder
“happy” die (Versatile Greetings 2 Die Set)
“Anniversary” stamp (All the Hearts Stamp Set, retired)
“Happy Birthday” die (Birthday Wishes Die Set)
Simple Alpha Die Set (“i” and “u”)
Heart die (Envelope Liner Die Set, retired)
“I believe in you” sentiment (Fragile Foliage Stamp Set, retired)
Stone Wall Stencil
Inks: Andromeda, Morning Frost, Hydrangea, Ocean Waves, Desert Night, Obsidian & Antique Gold
Brushed Gold Metallic Cardstock
Masking Paper
Double-sided Sheets
Labels & Tags 1 Die Set
Pink Ruby glitter cardstock (from the Pink Brilliance Glitter Cardstock Set)
Stellar Sequins — Clear Iridescent
So, what do you think — do you have a favorite? I’d love to hear your thoughts! And if you’re inspired to try your hand at paper piecing or paper weaving, please share your creations and tag me on Instagram: @caracaro33. I’d be thrilled to see what you make! Thank you so much for spending this time with me.
🎭 🎨 ✂️ 📖 Until next time — stay creative and happy crafting! 🎭 🎨 ✂️ 📖

Caroline! I am BLOWN AWAY by your clever techniques — all this hardwork and thought put into this challenge, its just WOW. Kudos to you for knocking it out of the park! Even the second part of the challenge is INCREDIBLE. Just wow!!!